Adjusting the blade alignment of lopping shears is a crucial maintenance task that ensures optimal performance and longevity of these essential gardening tools. As a trusted lopping shears supplier, I understand the importance of keeping your tools in top condition. In this blog post, I'll guide you through the process of adjusting the blade alignment of lopping shears, providing you with the knowledge and skills to keep your tools sharp and efficient.
Understanding the Importance of Blade Alignment
Before we dive into the adjustment process, let's take a moment to understand why blade alignment is so important. Proper blade alignment ensures that the cutting edges of the lopping shears meet precisely, allowing for clean and efficient cuts. When the blades are misaligned, the cutting action becomes less effective, requiring more force to cut through branches. This not only makes the job more difficult but also increases the risk of damaging the blades and the branches being cut.
In addition to improving cutting performance, proper blade alignment also helps to extend the lifespan of your lopping shears. When the blades are aligned correctly, they experience less wear and tear, reducing the need for frequent sharpening and replacement. This can save you time and money in the long run, making it well worth the effort to keep your blades properly aligned.
Types of Lopping Shears
There are several types of lopping shears available on the market, each with its own unique design and features. The most common types include bypass loppers, anvil loppers, Ratchet Bypass Lopper, Compound Action Loppers, and Compound Action Bypass Lopper. While the basic principles of blade alignment are the same for all types of lopping shears, the specific adjustment process may vary depending on the design of the tool.
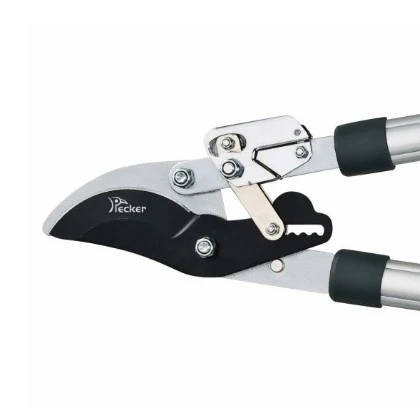
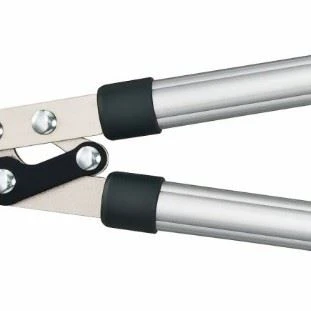
- Bypass Loppers: Bypass loppers feature two curved blades that pass by each other like scissors, providing a clean and precise cut. These loppers are ideal for cutting live branches and are the most commonly used type of lopping shears.
- Anvil Loppers: Anvil loppers have a single blade that cuts against a flat surface, or anvil. These loppers are better suited for cutting dead or dry branches, as the anvil provides extra support and prevents the branch from splitting.
- Ratchet Bypass Lopper: Ratchet bypass loppers are similar to traditional bypass loppers, but they feature a ratcheting mechanism that allows you to make multiple cuts with less effort. This makes them ideal for cutting thick branches.
- Compound Action Loppers: Compound action loppers use a system of levers and gears to multiply the force applied to the handles, making it easier to cut through thick branches. These loppers are often used by professional gardeners and arborists.
- Compound Action Bypass Lopper: Compound action bypass loppers combine the benefits of compound action and bypass cutting, providing a powerful and precise cutting tool. These loppers are suitable for a wide range of cutting tasks, from pruning small branches to cutting through thick trunks.
Tools and Materials Needed
Before you begin adjusting the blade alignment of your lopping shears, you'll need to gather a few tools and materials. Here's what you'll need:
- Wrench: A wrench is used to loosen and tighten the bolts that hold the blades in place. Make sure you have the correct size wrench for your lopping shears.
- Screwdriver: A screwdriver may be needed to remove any screws or covers that are blocking access to the blade adjustment mechanism.
- File: A file can be used to remove any burrs or rough edges from the blades after adjustment.
- Lubricant: Applying a lubricant to the blades and moving parts of the lopping shears can help to reduce friction and prevent rust.
Step-by-Step Guide to Adjusting Blade Alignment
Now that you have the necessary tools and materials, let's walk through the process of adjusting the blade alignment of your lopping shears.
Step 1: Inspect the Blades
Before you make any adjustments, it's important to inspect the blades for any signs of damage or wear. Look for cracks, chips, or dull edges, and replace the blades if necessary. You should also check the alignment of the blades by closing the lopping shears and observing how the blades meet. If the blades are misaligned, you'll notice a gap or overlap between the cutting edges.
Step 2: Loosen the Bolts
Using a wrench, loosen the bolts that hold the blades in place. Be careful not to remove the bolts completely, as you'll need them to secure the blades in the new position. Depending on the design of your lopping shears, you may need to remove a cover or access panel to reach the bolts.
Step 3: Adjust the Blades
Once the bolts are loose, you can begin adjusting the alignment of the blades. Use your fingers to gently move the blades into the correct position, making sure that the cutting edges meet precisely. You may need to make small adjustments to the position of the blades until you achieve the desired alignment.
Step 4: Tighten the Bolts
After you've adjusted the blades, use a wrench to tighten the bolts securely. Make sure the bolts are tightened evenly to prevent the blades from shifting out of alignment. Be careful not to overtighten the bolts, as this can damage the blades or the tool.
Step 5: Test the Blades
Once you've tightened the bolts, test the blades by closing the lopping shears and making a few cuts. Pay attention to how the blades cut through the material and whether the cutting action is smooth and efficient. If the blades are still misaligned or if you notice any problems with the cutting performance, you may need to repeat the adjustment process.
Step 6: File the Blades
After adjusting the blade alignment, use a file to remove any burrs or rough edges from the blades. This will help to improve the cutting performance of the lopping shears and prevent the blades from getting dull too quickly.
Step 7: Lubricate the Blades
Finally, apply a lubricant to the blades and moving parts of the lopping shears. This will help to reduce friction and prevent rust, ensuring that your lopping shears stay in good condition for longer.
Tips for Maintaining Blade Alignment
In addition to adjusting the blade alignment regularly, there are several other steps you can take to maintain the performance and longevity of your lopping shears. Here are some tips to keep in mind:
- Keep the Blades Clean: After each use, clean the blades of your lopping shears with a cloth or brush to remove any dirt, debris, or sap. This will help to prevent the blades from getting dull and corroded.
- Sharpen the Blades Regularly: Over time, the blades of your lopping shears will become dull and require sharpening. You can sharpen the blades yourself using a file or a sharpening stone, or you can take them to a professional sharpening service.
- Store the Lopping Shears Properly: When not in use, store your lopping shears in a dry place to prevent rust and corrosion. You can also apply a thin layer of oil or grease to the blades to protect them from the elements.
- Use the Right Tool for the Job: Make sure you're using the right type of lopping shears for the task at hand. Using the wrong tool can not only make the job more difficult but also increase the risk of damage to the tool and the branches being cut.
Conclusion
Adjusting the blade alignment of your lopping shears is a simple but important maintenance task that can help to improve the performance and longevity of your tools. By following the steps outlined in this blog post and taking good care of your lopping shears, you can ensure that they stay sharp and efficient for years to come.
If you're in the market for high-quality lopping shears or need more information about blade alignment and maintenance, please don't hesitate to contact us. We're a leading supplier of lopping shears and other gardening tools, and we're committed to providing our customers with the best products and services. Whether you're a professional gardener or a DIY enthusiast, we have the tools and expertise to help you get the job done right.
References
- [Gardening Tools Maintenance Guide](Publisher Name, Year)
- [Lopping Shears User Manual](Manufacturer Name, Year)